Why Do I Make Wine ?

I enjoy creating and sharing food and wine among friends, but that doesn't explain it completely. I am fascinated with the process of combining ingredients and watching the magic of nature and chemistry transform this mixture into something more then the sum of it's parts. Enjoying the results of my labor is just a happy reward along with the learning experience associated with my failures. I do this because I enjoy learning about food and wine and meeting like-minded people...

Tuesday, August 24, 2021

2021 Raspberry Wine


Harvest season in my Wasilla Alaska zone 4A home garden starts in mid-August and continues until freeze-up in late September.

Raspberries do very well in Alaska. I wash fresh picked berries and freeze them on sheet pans and then weigh out 1 pound and vacuum bag the frozen berries for storage in my deep freezer. I needed to make room in my little deep freezer for this season's produce so I pulled out 16 bags of frozen Raspberries to make a 5 gallon batch of Raspberry Wine.

On 8/24/2021 I combined the following ingredients:

16 lbs frozen Raspberries
10 lbs Sugar - dissolved in 3 Gal hot water
1/4 tsp Potassium Metabisulfite
2 1/2 tsp Pectic Enzyme
5 tsp Yeast Nutrient
2 1/2 tsp Acid Blend
1 1/4 tsp Grape Tannin

I added 2 Qts hot tap water to = about 6 Gals total must at 64 degrees F.

Let rest 24 hours before adding yeast.

On 8/25 The Specific Gravity reading was 1.090

I added 20 oz. sugar dissolved in 2 cups hot water to bring starting Specific Gravity up to 1.10

Total volume is about 6 1/2 gallons of must with pulp.

I rehydrated 1 package of Lalvin EC-1118 wine yeast in 1 cup of warm water and pitched the yeast. After 30 hours I was not seeing any activity, probably due to my 68 F cool temperature, so on 8/27 I added a second package of Lalvin EC-1118 yeast. I just sprinkled the dry yeast on top and did see fermentation activity within 24 hrs.

I stir the must daily and push down the floating cap for optimal color and flavor extraction. I will check the specific gravity readings and when fermentation slows down I will press the pulp and rack into a carboy.

On Saturday 9/11 - 17 days after pitching the yeast the Specific Gravity was 1.034 and the temperature is about 67 F.

On Saturday 9/18 - 24 days after pitching the yeast the Specific Gravity was 1.010 and the temperature was 66 F,

On Sunday 9/19 - I pressed the pulp....

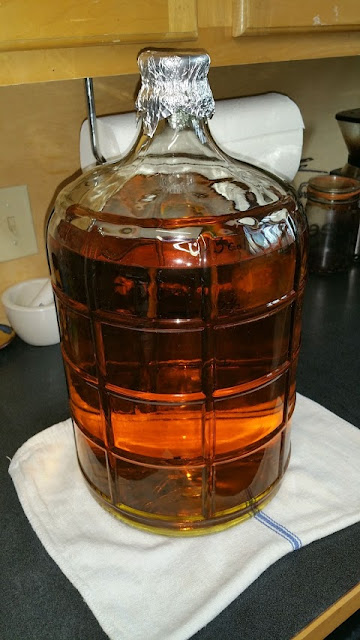
 ...and transferred to a 5 Gal. glass carboy. 

 I got about 5 1/2 Gal. of new wine.


I am using a waterless airlock that I really like.


Racked again on 11/13/2021 added 1/8 tsp Potassium Metabisulfite.


Specific Gravity 0.099 F.G. calculated at 14.4% Alcohol by volume. 

I plan on bulk aging 3 more months and then may bottle in mid-February if clear and de-gassed and then continue to bottle age...  now the waiting game begins. Come back here to follow the progress.

Thursday, October 31, 2019

Getting Organized

My wine making equipment and ingredients have been scattered all around my house and garage. Wherever I could find a place to store it. That always made it difficult to find whatever I needed to make a batch of wine. Hunting all over to find something was not fun. Many times I would find I was out of something I needed or it was too old to use so I needed to get everything organized in one place to keep track. I also don't have a basement in my home so I needed a dark and cool place for fermentation and aging. Some times I have several recipes going in various stages and carboys or primary fermenters all over the floor in my kitchen or spare bedroom. At least it is usually not too warm up here in Alaska and I keep my indoor heat set to 68 F for my comfort preference. I did try to cover glass carboys to keep out light. So I decided to set up  a spare closet to hold fermenters and large items...


And I had a plastic 2 drawer storage unit that would hold all of my smaller equipment and supplies.

Now I can keep track of everything in one central location. It is not perfect and means that my spare guest room closet is not really usable for hanging clothes. Oh well... it will do for now. It is a great improvement compared to my old and unorganized method.

Tuesday, October 22, 2019

Sparkling Apple Wine

My Sparkling Apple Wine label
When I lived in Iowa it was easy to obtain fresh pressed Apple Cider every Autumn from many local commercial apple farmers. Since I moved to Alaska in 1991 I found there are no commercial orchards up here and this is one of my favorite recipes that I have not made since I moved here. Yes, I could get apple juice here and even some fresh juice from Washington state in season - but the cost of shipping is quite high and not worth the high price to me. So I decided to try mixing up some juice from frozen concentrate that is always available at any local grocery store. I decided on the Treetop brand 100% juice that only contains added Ascorbic acid. I have a 3 gallon glass carboy so I decided to make a 2.5 gallon recipe. Pure Apple Juice has a Specific Gravity (S.G.) that will average about 1.050 and will produce a Hard Cider around 6% alcohol by volume. If you want to make a wine or champagne style beverage you will have to add sugar to reach the desired alcohol level in your finished wine.


Sparkling Apple Wine - 2.5 Gals
7 - 12 oz cans Treetop brand frozen 100% Apple Juice concentrate
+21 cans water = 252 oz for total volume of  2.625 Gals Apple Juice

*Note: One lb sugar will add about 10 oz of volume to your juice. So adding 3.5 lbs sugar did raise the Specific Gravity close to my target S.G. of 1.100 but it also raised the total juice volume by 35 oz for a total volume at 2.9 Gals. - Next time I will reduce the added water by 3 cans or about 1 quart and start with 3 lbs sugar.

3.5 lbs sugar
0.37 oz Potasium Metabisulfite
2 tsp Pectic Enzyme
3/4 tsp grape tannin
1.5 oz Acid Blend
2.5 tsp Yeast Nutrient

I will start by fermenting my Apple wine completely dry and when finished I will add a fining agent to help settle the yeast. When clear I will then add priming sugar and bottle in beer or champagne bottles and cap with crown caps to produce natural bottle conditioned sparkling Apple wine.


10/19 Mixed all ingredients in a 3 Gal glass carboy and let rest 24 hours.

10/20 Starting S.G. 1.098
The next day I dry pitched one pkg Lalvin EC-1118 champagne yeast.

I set up a closed fermentation system using a Blow-Off tube. A large 1.5 inch plastic tube will fit tightly into a 3 or 5 Gal carboy and I can get this tubing at my local Home Depot. I direct the tube into a 2 Gal bucket with about 1/2 Gal of sanitizer made with Sodium Metibisulfite and water.


Since I am working with all juice and no fruit pulp I do not need to stir the pulp or punch down the cap daily. A closed fermentation system is just another way to keep out bad bacteria and fruit flies and limit exposure to oxygen. I shake the carboy well as I mix all of the ingredients too make sure it is well oxygenated. This will insure there is enough oxygen to get the yeast started. Once the fermentation is active the yeast is anaerobic and does not need oxygen that can add oxidized or stale flavors to light wines. When the active fermentation slows I will replace the Blow-Off tube with a traditional airlock. When the fermentation is finished I will rack the new wine into several small glass jugs under airlocks to clear.

Activity was observed within a few hours and was very active in 24 hours.


10/24 Fermentation appeared to be slowing so I replaced the Blow-Off tube with an Airlock.


Final S.G. at bottling was 0.990 that = 14.6% alcohol by volume. I added 1/2 cup priming sugar and bottled in 21 oz. beer bottles with crown caps. I will update after 4 weeks aging.


Wednesday, October 9, 2019

Antique Wine Bottle Corker

Along with a small fruit press - this antique wine bottle corker is another one of my favorite wine-making devices. I found this at a local junk store here in Alaska over 20 years ago for $15 and it is amazing. Made by Sanbri a well known French wine equipment company. They made several smaller hand bottle corkers, but I cannot find this model any more.


This model is designed to be mounted onto a bench although I use it on the floor just fine. There was a cork pad on the base to cushion the bottles that was missing and I have replaced this with a rubber pad.


The corker height is easily adjusted with a thumb screw in the back to allow for different size bottles. There is a chamber that holds the cork and a lever to compress the cork before inserting into the bottle. You can also adjust the corker plunger to set the corks just below the bottle rim.


This is a very strong all metal corker that should last for many years...


Bottling your finished wine can be a chore. Washing bottles, removing old labels, and sanitizing bottles and equipment on bottling day. Filling and corking is much easier with the right equipment. A good corker is well worth the expense.

 
Although my sturdy antique corker is no longer available you may find one for sale on ebay if you are lucky. Most serious winemakers today use a wine bottle floor corker made in Portugal and available at many local wine-making shops or online from Amazon here.

https://www.amazon.com/gp/product/B0007PTG1C/ref=as_li_ss_tl?pf_rd_p=183f5289-9dc0-416f-942e-e8f213ef368b&pf_rd_r=RKYJ2PMPBK8W2Z61TYCA&linkCode=ll1&tag=wasialasgarda-20&linkId=8f6298c09540cc50c6d2ee8b24c7d940&language=en_US


First Winemaking Book

There are many excellent books on making wines. I recommend The Art of Making Wine by Stanley F. Anderson and Raymond Hull for any new winemaker. I first saw this book when my dad made a few wine kits many years ago. I eventually ended up with his copy. I lost the original book and I was happy to get another copy. It is still in print and it is a simple introduction to winemaking that also includes many good recipes.

https://www.amazon.com/gp/product/0452267447/ref=as_li_tl?ie=UTF8&tag=wasialasgarda-20&camp=1789&creative=9325&linkCode=as2&creativeASIN=0452267447&linkId=82d689b5d9243d6001d20518d2902b35

Whether you want to make traditional grape wine or country wines from your home grown fruits or berries, you will find all of the basic information here with simple easy to understand instructions. All of the steps are well explained and the ingredients that you will need to make excellent wines every time. You can get your own copy from Amazon here.

Another book that appeals to local Alaska wine-makers is Alaska Backyard Wines by Jan O'Mear  although it is currently out of print you may still find used copies on Amazon here.

https://www.amazon.com/Alaska-Backyard-Wines-Jan-OMeara/dp/0962154350/ref=olp_product_details?_encoding=UTF8&me=

A step-by-step guide to making delicious wines from fruits, flowers and plants commonly found in Alaska, but also found elsewhere. It gives a little background on wine making and detailed instructions for producing fine-tasting wines in one's own kitchen. It shows how easy wine making can be. It is beautifully illustrated with detailed line drawings. This book was named "Best Instructional Book" by the National Federation of Press Women in 1989.

Small Fruit Press

One of my favorite pieces of home wine-making equipment is a small sturdy plastic and metal fruit press that I picked up many years ago. It is good for small amounts of crushed soft fruits and berries just right for my 5 Gal. recipes that usually contain 15-20 lbs of fruit. The entire press is designed to be suspended inside of a plastic bucket to catch the juice. I use a fine mesh nylon pressing bag to hold the pulp and this gives me a very good yield of juice, flavor, and color.


I place the press in the bucket and the pressing bag inside the press and ladle the must into the press until full then fold over the bag and replace the pressing plate and and add the cross-bar and screw and suspend the press on the top of the bucket.


The pressing itself is quite slow and the screw is turned in stages with rest periods as the juice is extracted. I may open the press and loosen the pulp with a spoon to free more juice.

I am not able to find this fruit press available anymore. If you do find a source for this press, or a similar small press, please share it in the comments so others may get one if interested.

I have found a small fruit press that would work for 5 gallon recipes with 15-20 lbs of fruit that could be used in your kitchen without a large mess. You can find one on Amazon here.

https://www.amazon.com/Tabletop-Fruit-Press-1-25-Gallon/dp/B00EQFX11K/ref=as_li_ss_tl?keywords=wine+press&pd_rd_i=B00EQFX11K&pd_rd_r=5c74848a-30ca-43cc-a522-459599fe43ce&pd_rd_w=2Tjdx&pd_rd_wg=BndnI&pf_rd_p=a6d018ad-f20b-46c9-8920-433972c7d9b7&pf_rd_r=XR5PH71HMC9D80KH8ZN6&qid=1570741103&refinements=p_85:2470955011&rnid=2470954011&linkCode=ll1&tag=wasialasgarda-20&linkId=dffd5588201e5a6a7e105a8871c39099&language=en_US

I would recommend always using a fine nylon mesh pressing bag and placing the press inside of a large bucket with s drain spigot to catch the juice and have a hose from the spigot to your carboy. Many basket style fruit presses will pop and squirt the juice as it is pressed and can create quite a mess around the press if used in the traditional way.  I would not recommend such a small press for harder fruits such as apples or pears.

All fruits and berries need to be crushed first and most are fermented on the pulp for a week or so before pressing.
https://www.amazon.com/Winco-PTMP-24R-5-Inch-24-5-Inch-Propylene/dp/B00JCYSAB6/ref=as_li_ss_tl?keywords=restaurant+potato+masher&qid=1570743080&refinements=p_85:2470955011&rnid=2470954011&rps=1&sr=8-15&linkCode=ll1&tag=wasialasgarda-20&linkId=616a2b8b1c7a01964bc57e467bb4aec1&language=en_US

 For crushing soft fruit and berries I use a giant restaurant potato masher with a 24 inch handle. You can find this model on Amazon here. This is much easier than stomping berries with your feet - Ha! It is recommended that you freeze your fruit first and then thaw which will help to soften the fruit before crushing. I usually freeze my fruit anyway as I harvest until I have enough to make wine. When making rhubarb wine you can just cut the stalks into half-inch pieces - but lately I use my food processor to puree the rhubarb into a pulp. It can take a while to do 15 lbs but not as tiring as chopping by hand.

Saturday, September 7, 2019

Gooseberry Wine 2019

I grew these Pixwell gooseberries at home and it took several years to collect enough for a 5 Gal. recipe. I cleaned, de-stemmed and froze the berries until I had enough. Some were green some were red and most were in between. They did add a light red color to the juice.  


5 Gal. Goosebrry Wine - Vin de groseille à maquereau
18 lbs Gooseberries
12 lbs Sugar
1/4 + 1/8 tsp Potassium Metabisulfite (0.74 oz.)
3 tsp Pectic Enzyme
5 tsp Diammonium phosphate Yeast Nutrient
2 1/2 tsp Acid Blend
1 1/2 tsp grape tannin
Add Water to = 6 Gals with pulp

8/9/2019 Mixed 18 lbs of crushed Gooseberries + 12 lbs sugar. Added K-meta and Pectic Enzyme with berries and sugar and rest 12 hrs to extract juice. Added 3 Gal water = 6 Gal total with pulp + nutrient, tannin, and acid blend.


8/10/2019 Starting S.G. 1.104 Dry pitched 2 pkgs. Lalvin 71B Wine Yeast. Stirred daily.

9/2/2019 S.G 1.070 Fermenting very slow? Room may be too cool at 65 F Added some more DAP


9/6/2019 S.G. 1.058 Only 50% after 4 weeks in primary? Pressed pulp and transferred to 7 Gal. Carboy. Added 2 tsp Yeast Energizer (vitamin B complex, DAP, Yeast Hulls and Magnesium Sulphate) and added airlock. No off flavor or odor - still seems good. Active fermentation observed after a few hours.


10/2/2019 S.G. 1.020  Racked to 5 Gal. Carboy. Still very sweet? No bad flavors. Lots of CO2.

Will rack again and top up when fermentation is finished.